Search

Just Another Tech Blog

A mind is like a parachute. It doesn't work if it is not open.

Category

Ubuntu

How To Add Host Entry In Android Virtual Device (AVD)


Pre-requirements:

  1. You need to have installed Android SDK and an Android Virtual Device (AVD)
  2. I did this on Ubuntu 16.04 LTS, it should work for other OS as well but I did not tested

Go for the action:

  1. We are assuming you have android installed in ~/Android location
  2. We are assuming you have an AVD named Nexus-4-API-22

Open a terminal and run the following command:

cd ~/Android/Sdk/tools && ./emulator -avd Nexus-4-API-22
cd ~/Android/Sdk/tools
emulator -avd Nexus-4-API-22 -partition-size 2048 -writable-system

Open another terminal and type the following commands one by one:

It will run the AVD

cd ~/Android/Sdk/platform-tools/
adb devices

If this shows any error run again, it should show the output as below:

abqu@dhaabquubu:~/Android/Sdk/platform-tools$ adb devices
abqu@dhaabquubu:~/Android/Sdk/platform-tools$ adb devicesadb: /home/abqu/.linuxbrew/lib/libcrypto.so.1.0.0: no version information available (required by adb)
List of devices attached 
emulator-5554 device

Now note the device name, here the device name is emulator-5554

adb root
adb -s emulator-5554 remount
adb -s emulator-5554 pull /system/etc/hosts hosts
ll

Here, the hosts file should appear in the file list.
Now, open the hosts file in a text editor and add the host entry into the file the save the hosts file.

sublime-text hosts

After editing the hosts file run the below command:

adb -s emulator-5554 push hosts /system/etc/hosts
adb reboot

It will reboot the AVD and we should now be able to browse your website in AVD with host entry.

Happy testing!!!


Mobile Automation With Appium, Robot Framework and Android SDK in Ubuntu


Automation becomes an essential part of software testing. For the frequent changes/updates in any software it is necessary to have an fully automated process to test the software to ensure it’s functionalities are working properly. Robot Framework is one of the most handy choice for a well structured automation process of any kind of software or web-application. Mostly, because of it’s built in keywords and reporting features. It’s also highly customizable.

On the other hand, in the era of smart phones and tabs the mobile phone users are increasing dramatically. Therefore, the developers and QA’s need to focus on mobile phone support and testing. So, mobile automation is becoming more important unlike desktop automation. So. here’s the start up article about how can initiate mobile automation.

As the title says we are going to use Robot framework for writing automation scripts and Appium as the server to communicate with the mobile devices. For this tutorial I have used Android virtual Device (AVD) which comes with Android SDK. You can also use real devices as well by making some very minor changes. We have Ubuntu 16.04 LTS for our test environment. You can also setup the test environment on any Windows or MAC OS as well.

Step 1: Installing dependencies

Install Java JDK:

For installing Java JDK there is good instructions in the oracle site, besides that, there are  numbers of tutorial you will find in google search. Here’s what I did to install,

Please note: The JDK version may vary time to time so this might not always right steps for you.

sudo add-apt-repository ppa:webupd8team/java

sudo apt-get update

sudo apt-get install oracle-java8-installer

sudo update-alternatives --config java

The output will look something like the following. In this case, this is what the output will look like with all Java versions mentioned above installed.

Output:
There are 5 choices for the alternative java (providing /usr/bin/java).

  Selection    Path                                            Priority   Status
------------------------------------------------------------
* 0            /usr/lib/jvm/java-8-openjdk-amd64/jre/bin/java   1081      auto mode
  1            /usr/lib/jvm/java-6-oracle/jre/bin/java          1         manual mode
  2            /usr/lib/jvm/java-7-oracle/jre/bin/java          2         manual mode
  3            /usr/lib/jvm/java-8-openjdk-amd64/jre/bin/java   1081      manual mode
  4            /usr/lib/jvm/java-8-oracle/jre/bin/java          3         manual mode
  5            /usr/lib/jvm/java-9-oracle/bin/java              4         manual mode

Press <enter> to keep the current choice[*], or type selection number:

You can now choose the number to use as a default.

Now verify Java installation:

abqu@dhaabquubu:~$ java -version
openjdk version "1.8.0_131"
OpenJDK Runtime Environment (build 1.8.0_131-8u131-b11-2ubuntu1.16.04.3-b11)
OpenJDK 64-Bit Server VM (build 25.131-b11, mixed mode)

Set JAVA_HOME:

For setting JAVA_HOME open your ~/.bashrc file in any text editor and add the following 2 lines at the end of the file:

nano ~/.bashrc

Add these 2 lines:

Please note: your JAVA_HOME path should be exactly as the output for the sudo update-alternatives –config java command

export JAVA_HOME=/usr/lib/jvm/java-8-openjdk-amd64/jre/bin/java
export PATH=${JAVA_HOME}/bin:$PATH

Install Selenium:

Please follow this post for the Selenium installation tutorial: How to Install Python, PIP, Selenium, Chrome and Firefox Driver

Install Robot Framework:

Please follow this post for the Robot Framework installation tutorial: Python Robot Framework Install

Install Robot framework Appium library:

pip install robotframework-appiumlibrary --user

Install Sublime-text-2 editor (Optional):

sudo add-apt-repository ppa:webupd8team/sublime-text-2
sudo apt-get update
sudo apt-get install sublime-text

Install homebrew (for linux):

Please follow this post for homebrew installation tutorial: Install Homebrew In Ubuntu 16.04

Install Nodejs (NOT AS ROOT USER), Appium, WD and appium-doctor:

brew update
brew install node
brew link node
npm install -g appium
npm install wd
npm install -g appium-doctor

Now, run appium command to check the appium server is running properly:

abqu@dhaabquubu:~$ appium
[Appium] Welcome to Appium v1.7.1 (REV ce9a10fa47b486859e53c0991c0672c0c2aa8bba)
[Appium] Appium REST http interface listener started on 0.0.0.0:4723

Also, run appium-doctor command to check the missing configuration:

abqu@dhaabquubu:~$ appium-doctor
info AppiumDoctor Appium Doctor v.1.4.3
info AppiumDoctor ### Diagnostic starting ###
info AppiumDoctor ✔ The Node.js binary was found at: /home/abqu/.linuxbrew/bin/node
info AppiumDoctor ✔ Node version is 8.7.0
info AppiumDoctor ✔ ANDROID_HOME is set to: /home/abqu/Android/Sdk
info AppiumDoctor ✔ JAVA_HOME is set to: /usr/lib/jvm/java-8-openjdk-amd64/jre/bin/java
info AppiumDoctor ✔ adb exists at: /home/abqu/Android/Sdk/platform-tools/adb
info AppiumDoctor ✔ android exists at: /home/abqu/Android/Sdk/tools/android
info AppiumDoctor ✔ emulator exists at: /home/abqu/Android/Sdk/tools/emulator
info AppiumDoctor ✔ Bin directory of $JAVA_HOME is set
info AppiumDoctor ### Diagnostic completed, no fix needed. ###
info AppiumDoctor 
info AppiumDoctor Everything looks good, bye!
info AppiumDoctor

Please note: At this point you may find some ‘x’ sign in the appium-doctor output, it should all be ✔ at the end of this tutorial.

Install Android SDK:

sudo add-apt-repository ppa:maarten-fonville/android-studio

sudo apt update

sudo apt install android-studio

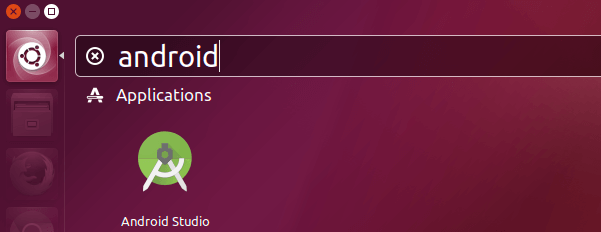
During the installation, the latest Android Studio zip file will be downloaded from Google server. Once the installation is finished, you can open Android Studio from Unity Dash or your preferred app launcher.

android-studio-ubuntu

If the icon didn’t load, then please log out and log back in or use the following command to start Android Studio.

/opt/android-studio/bin/studio.sh

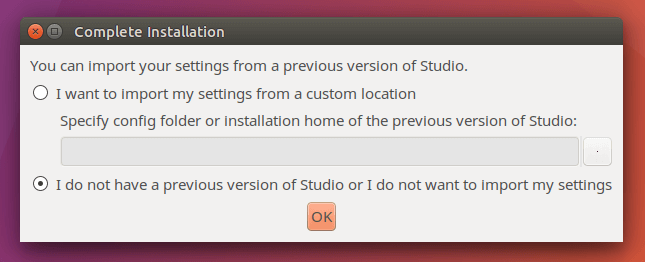
Select whether you want to import previous Android Studio settings or not, then click OK.

ubuntu-android-studio

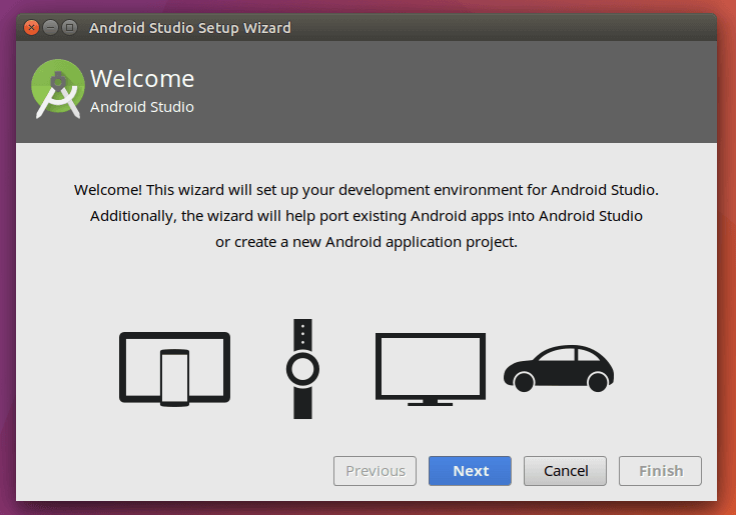
Then follow the setup wizard. You will prompted to install Android SDK Tools, Android platform tools, Android support library, etc.

android-studio-ubuntu-16.04

Set ANDROID_HOME:

Unlike setting up JAVA_HOME, open the ~/.bashrc file and add the following 2 lines at the bottom of the file then save the file:

export ANDROID_HOME=/home/abqu/Android/Sdk
export PATH=$PATH:$ANDROID_HOME/tools:$ANDROID_HOME/platform-tools

Create Android Virtual Device(AVD)/Emulator:

Please Note: I recommend to use the same device and system image version to use for the first time which has been show in this tutorial. If you use some other device or system image version then you need to change the open application string accordingly in the demo.txt robot script which has been used at the end of this tutorial. Therefore, I suggest, when you gain enough knowledge about appium then you can go for any device and system image.

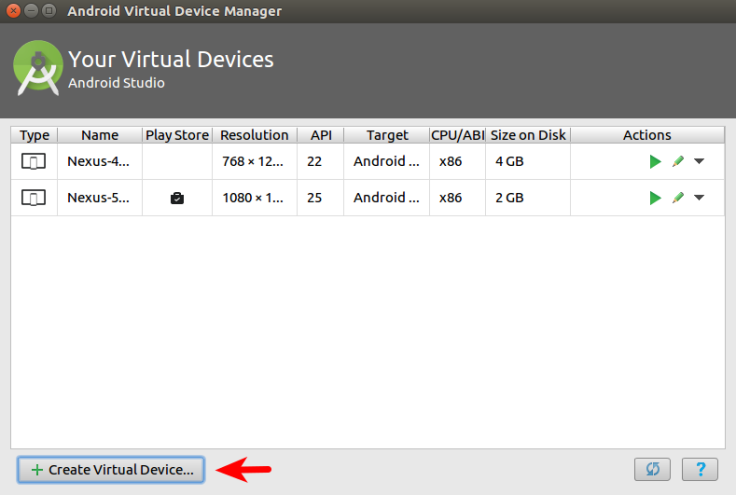
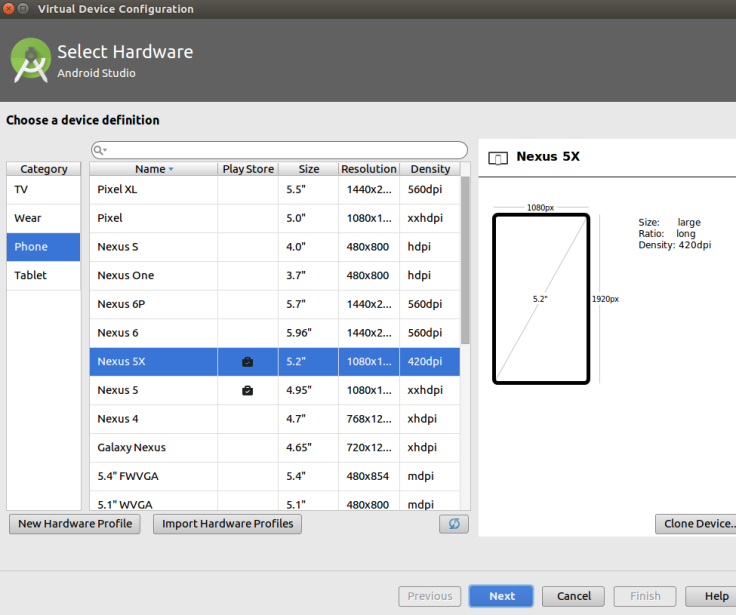
For creating an AVD open the Android studio, then click on the AVD Manager button.

Selection_043

The AVD manager window will open. Now, follow next button and choose your desire android device and OS version.

Selection_044

Please note: At the very first time the device list will be empty, so click Create Virtual Device… button

First you need to choose a device, here in this tutorial I used Nexus 4.

Selection_045

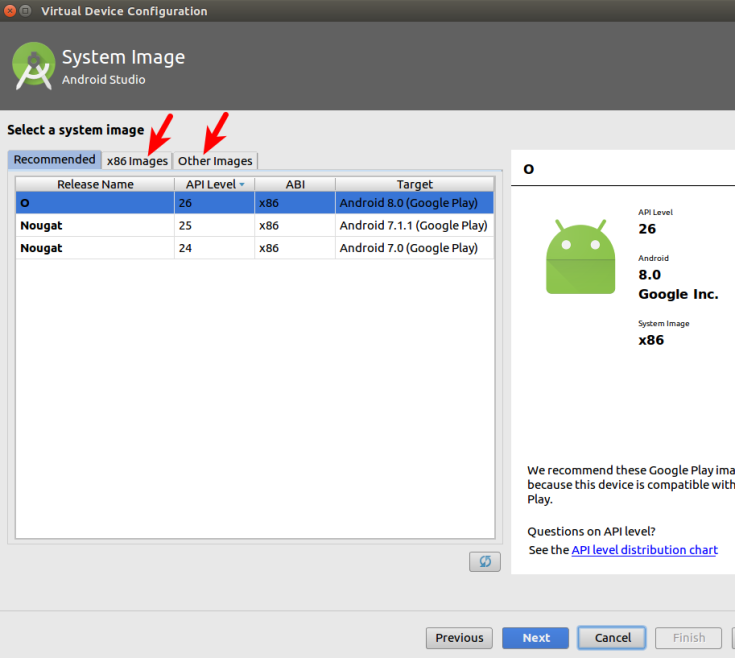
Now, you need to download the system image/OS, if there is no system image in the Recommended tab then click other two tabs and download them. It will take time to download the system image, so keep patient.

Selection_046

Then follow the Next button and complete the AVD creation.

See the list of AVDs:

Go to ~/Android/Sdk/emulators and run the following commands:

abqu@dhaabquubu:~/Android/Sdk/emulator$ emulator -list-avds
Nexus-4-API-22
Nexus-5X-API-25

The list of AVDs will appear.

The name of the AVDs are very important, so, keep it.

Run the AVDs:

Now run the AVD using following command:

cd ~/Android/Sdk/tools && ./emulator -avd Nexus-4-API-22

Note: Here, you need to replace the Nexus-4-API-22 part with your AVD name.

Install Python six package:

pip install six --user

Run the appium server using appium command.

Now run the appium-doctor command again to check if everything is good.

The output should be like below:

abqu@dhaabquubu:~$ appium-doctor
info AppiumDoctor Appium Doctor v.1.4.3
info AppiumDoctor ### Diagnostic starting ###
info AppiumDoctor ✔ The Node.js binary was found at: /home/abqu/.linuxbrew/bin/node
info AppiumDoctor ✔ Node version is 8.7.0
info AppiumDoctor ✔ ANDROID_HOME is set to: /home/abqu/Android/Sdk
info AppiumDoctor ✔ JAVA_HOME is set to: /usr/lib/jvm/java-8-openjdk-amd64/jre/bin/java
info AppiumDoctor ✔ adb exists at: /home/abqu/Android/Sdk/platform-tools/adb
info AppiumDoctor ✔ android exists at: /home/abqu/Android/Sdk/tools/android
info AppiumDoctor ✔ emulator exists at: /home/abqu/Android/Sdk/tools/emulator
info AppiumDoctor ✔ Bin directory of $JAVA_HOME is set
info AppiumDoctor ### Diagnostic completed, no fix needed. ###
info AppiumDoctor 
info AppiumDoctor Everything looks good, bye!
info AppiumDoctor


Write Robot scripts and run:

Now, all set up so you can write the automation scripts and run it.

Here is a demo robot file for testing:

*** Settings ***

Library AppiumLibrary

Documentation demo for appium library

Force Tags demo


*** Test Cases ***

test_demo

[Tags] regression

Open Application http://localhost:4723/wd/hub platformName=Android platformVersion=5.1.1 deviceName=Nexus-4-API-22 app=com.android.browser browserName=Browser

Go To Url http://facebook.com
 Wait Until Page Contains Element xpath=//input[@type='email']
 Input Text xpath=//input[@type='email'] test@gmail.com
 Sleep 5

For testing you can save the above code into a file called demo.txt and make it executable then run it from terminal using pybot demo.txt command:

chmod +x demo.txt

pybot demo.txt

Note: You must have the AVD and Appium server running before executing the pybot demo.txt command.

You will see the script will create a browser instance and open the Facebook login page then in the email field it will input ‘test@gmail.com’ email.

If everything goes well you should see the following output in the terminal:

abqu@dhaabquubu:~/Documents/appium-rnd$ pybot demo3.txt 
==============================================================================
Demo3 :: demo for appium library 
==============================================================================
test_demo | PASS |
------------------------------------------------------------------------------
Demo3 :: demo for appium library | PASS |
1 critical test, 1 passed, 0 failed
1 test total, 1 passed, 0 failed
==============================================================================
Output: /home/abqu/Documents/appium-rnd/output.xml
Log: /home/abqu/Documents/appium-rnd/log.html
Report: /home/abqu/Documents/appium-rnd/report.html

That’s it!! Happy testing!!!

Install Homebrew In Ubuntu 16.04


Intro

LinuxBrew is a Linux-fork of the popular Mac OS X HomeBrew package manager.

LinuxBrew is package-management-software, which enables installing packages from source, on top on the system’s default package management (e.g. “apt/deb” in Debian/Ubuntu and “yum/rpm” in CentOS/RedHat).

Preparing for LinuxBrew – Debian/Ubuntu

For Debian/Ubuntu-based systems, run the following commands:

$ sudo apt-get update
$ sudo apt-get upgrade -y
$ sudo sudo apt-get install -y build-essential make cmake scons curl git \
                               ruby autoconf automake autoconf-archive \
                               gettext libtool flex bison \
                               libbz2-dev libcurl4-openssl-dev \
                               libexpat-dev libncurses-dev

Installing LinuxBrew

Step 1 – Clone LinuxBrew

To keep things tidy, clone LinuxBrew into a hidden directory in the user’s home directory:

$ git clone https://github.com/Homebrew/linuxbrew.git ~/.linuxbrew

Step 2 – Update environment variables

The next step is to add LinuxBrew to the user’s environment variables.

Add the following lines to the end of the user’s ~/.bashrc file:

# Until LinuxBrew is fixed, the following is required.
# See: https://github.com/Homebrew/linuxbrew/issues/47
export PKG_CONFIG_PATH=/usr/local/lib/pkgconfig:/usr/local/lib64/pkgconfig:/usr/lib64/pkgconfig:/usr/lib/pkgconfig:/usr/lib/x86_64-linux-gnu/pkgconfig:/usr/lib64/pkgconfig:/usr/share/pkgconfig:$PKG_CONFIG_PATH
## Setup linux brew
export LINUXBREWHOME=$HOME/.linuxbrew
export PATH=$LINUXBREWHOME/bin:$PATH
export MANPATH=$LINUXBREWHOME/man:$MANPATH
export PKG_CONFIG_PATH=$LINUXBREWHOME/lib64/pkgconfig:$LINUXBREWHOME/lib/pkgconfig:$PKG_CONFIG_PATH
export LD_LIBRARY_PATH=$LINUXBREWHOME/lib64:$LINUXBREWHOME/lib:$LD_LIBRARY_PATH

Step 3 – Test installation

To ensure those changes take effect, log-out and log-in again. The shell should then use these new settings.

To test these new settings, try:

$ which brew
/home/ubuntu/.linuxbrew/bin/brew
$ echo $PKG_CONFIG_PATH
/home/ubuntu/.linuxbrew/lib64/pkgconfig:/home/ubuntu/.linuxbrew/lib/pkgconfig:/usr/local/lib/pkgconfig:/usr/local/lib64/pkgconfig:/usr/lib64/pkgconfig:/usr/lib/pkgconfig:/usr/lib/x86_64-linux-gnu/pkgconfig:/usr/lib64/pkgconfig:/usr/share/pkgconfig:

Install a package

To install a package, run brew install PACKAGE.

Example: brew install hello

The output should be appeared as below:

ubuntu@ubuntu:~$ brew install hello
Updating Homebrew...
==> Homebrew has enabled anonymous aggregate user behaviour analytics.
Read the analytics documentation (and how to opt-out) here:
 https://docs.brew.sh/Analytics.html

==> Installing dependencies for hello: patchelf
==> Installing hello dependency: patchelf
==> Downloading https://linuxbrew.bintray.com/bottles/patchelf-0.9_1.x86_64_linux.bottle.tar.gz
######################################################################## 100.0%
==> Pouring patchelf-0.9_1.x86_64_linux.bottle.tar.gz
🍺 /home/ubuntu/.linuxbrew/Cellar/patchelf/0.9_1: 6 files, 1.2MB
==> Installing hello
==> Downloading https://linuxbrew.bintray.com/bottles/hello-2.10.x86_64_linux.bottle.tar.gz
######################################################################## 100.0%
==> Pouring hello-2.10.x86_64_linux.bottle.tar.gz
🍺 /home/ubuntu/.linuxbrew/Cellar/hello/2.10: 52 files, 595.5KB


Install Apache Ant on Ubuntu


1. Prerequisite

The current version of Apache Ant is 1.9.x which requires Java 1.5 at minimum. Therefore, you should make sure you have suitable Java installed on your environment.

2. Install Apache Ant on Ubuntu manually

Download Ant

You can download Ant distribution from the Apache Ant website. Currently, the latest release of Ant is version 1.9.7.

In the following command, I will download the binary only version of Ant:

replace the http URL with the latest ant version URL.
sudo tar -xf apache-ant-1.9.7-bin.tar.gz  -C /usr/local

The above command will unpack the Ant distribution to /usr/local/apache-ant-1.9.7

You can also extract the zip file manually and copy it to the /usr/local/ location.

Next, we will create a symbolic link to the Ant distribution:

sudo ln -s /usr/local/apache-ant-1.9.7/ /usr/local/ant

Create ANT_HOME Environment Variables

Create a ant.sh file at /etc/profile.d folder (you can use vi with below command)

sudo vim /etc/profile.d/ant.sh

Enter the follow content to the file:

export ANT_HOME=/usr/local/ant

export PATH=${ANT_HOME}/bin:${PATH}

Save the file.

We will need to activate the above environment variables. We can do that by log out and log in again or simply run below command:

source /etc/profile

Verification

We can verify whether Maven is installed successfully or not by type command:

ant -version

The output is similar to:

Apache Ant(TM) version 1.9.7 compiled on April 9 2016

Source: https://howtoprogram.xyz

How To Install and Use Docker on Ubuntu 16.04


Prerequisites

To follow this tutorial, you will need the following:

  • 64-bit Ubuntu 16.04 server
  • Non-root user with sudo privileges

Note: Docker requires a 64-bit version of Ubuntu as well as a kernel version equal to or greater than 3.10. The default 64-bit Ubuntu 16.04 server meets these requirements.

All the commands in this tutorial should be run as a non-root user. If root access is required for the command, it will be preceded by sudo.

Step 1 — Installing Docker

The Docker installation package available in the official Ubuntu 16.04 repository may not be the latest version. To get the latest and greatest version, install Docker from the official Docker repository. This section shows you how to do just that.

First, add the GPG key for the official Docker repository to the system:

  • curl -fsSL https://download.docker.com/linux/ubuntu/gpg | sudo apt-key add -

Add the Docker repository to APT sources:

  • sudo add-apt-repository "deb [arch=amd64] https://download.docker.com/linux/ubuntu $(lsb_release -cs) stable"

Next, update the package database with the Docker packages from the newly added repo:

  • sudo apt-get update

Make sure you are about to install from the Docker repo instead of the default Ubuntu 16.04 repo:

  • apt-cache policy docker-ce

You should see output similar to the follow:
Output of apt-cache policy docker-ce

docker-ce:
  Installed: (none)
  Candidate: 17.03.1~ce-0~ubuntu-xenial
  Version table:
     17.03.1~ce-0~ubuntu-xenial 500
        500 https://download.docker.com/linux/ubuntu xenial/stable amd64 Packages
     17.03.0~ce-0~ubuntu-xenial 500
        500 https://download.docker.com/linux/ubuntu xenial/stable amd64 Packages

Notice that docker-ce is not installed, but the candidate for installation is from the Docker repository for Ubuntu 16.04. The docker-ce version number might be different.

Finally, install Docker:

  • sudo apt-get install -y docker-ce

Docker should now be installed, the daemon started, and the process enabled to start on boot. Check that it’s running:

  • sudo systemctl status docker

The output should be similar to the following, showing that the service is active and running:
Output:

● docker.service - Docker Application Container Engine
   Loaded: loaded (/lib/systemd/system/docker.service; enabled; vendor preset: enabled)
   Active: active (running) since Sun 2016-05-01 06:53:52 CDT; 1 weeks 3 days ago
     Docs: https://docs.docker.com
 Main PID: 749 (docker)

Installing Docker now gives you not just the Docker service (daemon) but also the docker command line utility, or the Docker client. We’ll explore how to use the docker command later in this tutorial.

Step 2 — Executing the Docker Command Without Sudo (Optional)

By default, running the docker command requires root privileges — that is, you have to prefix the command with sudo. It can also be run by a user in the docker group, which is automatically created during the installation of Docker. If you attempt to run the docker command without prefixing it with sudo or without being in the docker group, you’ll get an output like this:
Output:

docker: Cannot connect to the Docker daemon. Is the docker daemon running on this host?.
See 'docker run --help'.

If you want to avoid typing sudo whenever you run the docker command, add your username to the docker group:

  • sudo usermod -aG docker ${USER}

To apply the new group membership, you can log out of the server and back in, or you can type the following:

  • su - ${USER}

You will be prompted to enter your user’s password to continue. Afterwards, you can confirm that your user is now added to the docker group by typing:

  • id -nG

Output:

sammy sudo docker

If you need to add a user to the docker group that you’re not logged in as, declare that username explicitly using:

  • sudo usermod -aG docker username

The rest of this article assumes you are running the docker command as a user in the docker user group. If you choose not to, please prepend the commands with sudo.

Step 3 — Using the Docker Command

With Docker installed and working, now’s the time to become familiar with the command line utility. Using docker consists of passing it a chain of options and commands followed by arguments. The syntax takes this form:

  • docker [option] [command] [arguments]

To view all available subcommands, type:

  • docker

As of Docker 1.11.1, the complete list of available subcommands includes:

Output:
attach Attach to a running container
build Build an image from a Dockerfile
commit Create a new image from a container's changes
cp Copy files/folders between a container and the local filesystem
create Create a new container
diff Inspect changes on a container's filesystem
events Get real time events from the server
exec Run a command in a running container
export Export a container's filesystem as a tar archive
history Show the history of an image
images List images
import Import the contents from a tarball to create a filesystem image
info Display system-wide information
inspect Return low-level information on a container or image
kill Kill a running container
load Load an image from a tar archive or STDIN
login Log in to a Docker registry
logout Log out from a Docker registry
logs Fetch the logs of a container
network Manage Docker networks
pause Pause all processes within a container
port List port mappings or a specific mapping for the CONTAINER
ps List containers
pull Pull an image or a repository from a registry
push Push an image or a repository to a registry
rename Rename a container
restart Restart a container
rm Remove one or more containers
rmi Remove one or more images
run Run a command in a new container
save Save one or more images to a tar archive
search Search the Docker Hub for images
start Start one or more stopped containers
stats Display a live stream of container(s) resource usage statistics
stop Stop a running container
tag Tag an image into a repository
top Display the running processes of a container
unpause Unpause all processes within a container
update Update configuration of one or more containers
version Show the Docker version information
volume Manage Docker volumes
wait Block until a container stops, then print its exit code

To view the switches available to a specific command, type:

  • docker docker-subcommand --help

To view system-wide information about Docker, use:

  • docker info

Step 4 — Working with Docker Images

Docker containers are run from Docker images. By default, it pulls these images from Docker Hub, a Docker registry managed by Docker, the company behind the Docker project. Anybody can build and host their Docker images on Docker Hub, so most applications and Linux distributions you’ll need to run Docker containers have images that are hosted on Docker Hub.

To check whether you can access and download images from Docker Hub, type:

  • docker run hello-world

The output, which should include the following, should indicate that Docker in working correctly:

Output:

Hello from Docker.
This message shows that your installation appears to be working correctly.
...

You can search for images available on Docker Hub by using the docker command with the searchsubcommand. For example, to search for the Ubuntu image, type:

  • docker search ubuntu

The script will crawl Docker Hub and return a listing of all images whose name match the search string. In this case, the output will be similar to this:

Output:

NAME DESCRIPTION STARS OFFICIAL AUTOMATED
ubuntu Ubuntu is a Debian-based Linux operating s... 3808 [OK]
ubuntu-upstart Upstart is an event-based replacement for ... 61 [OK]
torusware/speedus-ubuntu Always updated official Ubuntu docker imag... 25 [OK]
rastasheep/ubuntu-sshd Dockerized SSH service, built on top of of... 24 [OK]
ubuntu-debootstrap debootstrap --variant=minbase --components... 23 [OK]
nickistre/ubuntu-lamp LAMP server on Ubuntu 6 [OK]
nickistre/ubuntu-lamp-wordpress LAMP on Ubuntu with wp-cli installed 5 [OK]
nuagebec/ubuntu Simple always updated Ubuntu docker images... 4 [OK]
nimmis/ubuntu This is a docker images different LTS vers... 4 [OK]
maxexcloo/ubuntu Docker base image built on Ubuntu with Sup... 2 [OK]
admiringworm/ubuntu Base ubuntu images based on the official u... 1 [OK]


In the OFFICIAL column, OK indicates an image built and supported by the company behind the project. Once you’ve identified the image that you would like to use, you can download it to your computer using the pull subcommand, like so:

  • docker pull ubuntu

After an image has been downloaded, you may then run a container using the downloaded image with the run subcommand. If an image has not been downloaded when docker is executed with the runsubcommand, the Docker client will first download the image, then run a container using it:

  • docker run ubuntu

To see the images that have been downloaded to your computer, type:

  • docker images

The output should look similar to the following:

Output:

REPOSITORY          TAG                 IMAGE ID            CREATED             SIZE
ubuntu              latest              c5f1cf30c96b        7 days ago          120.8 MB
hello-world         latest              94df4f0ce8a4        2 weeks ago         967 B

As you’ll see later in this tutorial, images that you use to run containers can be modified and used to generate new images, which may then be uploaded (pushed is the technical term) to Docker Hub or other Docker registries.

Step 5 — Running a Docker Container

The hello-world container you ran in the previous is an example of a container that runs and exits, after emitting a test message. Containers, however, can be much more useful than that, and they can be interactive. After all, they are similar to virtual machines, only more resource-friendly.

As an example, let’s run a container using the latest image of Ubuntu. The combination of the -i and -tswitches gives you interactive shell access into the container:

  • docker run -it ubuntu

Your command prompt should change to reflect the fact that you’re now working inside the container and should take this form:

Output:

root@d9b100f2f636:/#

Important: Note the container id in the command prompt. In the above example, it is d9b100f2f636.

Now you may run any command inside the container. For example, let’s update the package database inside the container. No need to prefix any command with sudo, because you’re operating inside the container with root privileges:

  • apt-get update

Then install any application in it. Let’s install NodeJS, for example.

  • apt-get install -y nodejs

Step 6 — Listing Docker Containers

After using Docker for a while, you’ll have many active (running) and inactive containers on your computer. To view the active ones, use:

  • docker ps

You will see output similar to the following:

Output:

CONTAINER ID        IMAGE               COMMAND             CREATED             STATUS              PORTS               NAMES
f7c79cc556dd        ubuntu              "/bin/bash"         3 hours ago         Up 3 hours                              silly_spence

To view all containers — active and inactive, pass it the -a switch:

  • docker ps -a

To view the latest container you created, pass it the -l switch:

  • docker ps -l

Stopping a running or active container is as simple as typing:

  • docker stop container-id

The container-id can be found in the output from the docker ps command.

Step 7 — Committing Changes in a Container to a Docker Image

When you start up a Docker image, you can create, modify, and delete files just like you can with a virtual machine. The changes that you make will only apply to that container. You can start and stop it, but once you destroy it with the docker rm command, the changes will be lost for good.

This section shows you how to save the state of a container as a new Docker image.

After installing nodejs inside the Ubuntu container, you now have a container running off an image, but the container is different from the image you used to create it.

To save the state of the container as a new image, first exit from it:

  • exit

Then commit the changes to a new Docker image instance using the following command.

Note: If you run an image and made some modification and now want to save the modified image locally then follow the below steps:

  • use docker ps -a command to see the container listing and copy the container id.
  • now, use:
docker commit <container-id> <new-image-name>

It will save the modified modified image as the <new-image-name>. You can see the new modified image using the docker images command.

The -m switch is for the commit message that helps you and others know what changes you made, while -a is used to specify the author. The container ID is the one you noted earlier in the tutorial when you started the interactive docker session. Unless you created additional repositories on Docker Hub, the repository is usually your Docker Hub username:

  • docker commit -m "What did you do to the image" -a "Author Name" container-id repository new_image_name

For example:

  • docker commit -m "added node.js" -a "Sunday Ogwu-Chinuwa" d9b100f2f636 finid/ubuntu-nodejs

Note: When you commit an image, the new image is saved locally, that is, on your computer. Later in this tutorial, you’ll learn how to push an image to a Docker registry like Docker Hub so that it may be assessed and used by you and others.

After that operation has completed, listing the Docker images now on your computer should show the new image, as well as the old one that it was derived from:

  • docker images

The output should be similar to this:

Output:

finid/ubuntu-nodejs      latest              62359544c9ba        50 seconds ago      206.6 MB
ubuntu              latest              c5f1cf30c96b        7 days ago          120.8 MB
hello-world         latest              94df4f0ce8a4        2 weeks ago         967 B

In the above example, ubuntu-nodejs is the new image, which was derived from the existing ubuntu image from Docker Hub. The size difference reflects the changes that were made. And in this example, the change was that NodeJS was installed. So next time you need to run a container using Ubuntu with NodeJS pre-installed, you can just use the new image. Images may also be built from what’s called a Dockerfile. But that’s a very involved process that’s well outside the scope of this article.


Step 8 — Pushing Docker Images to a Docker Repository

The next logical step after creating a new image from an existing image is to share it with a select few of your friends, the whole world on Docker Hub, or other Docker registry that you have access to. To push an image to Docker Hub or any other Docker registry, you must have an account there.

This section shows you how to push a Docker image to Docker Hub. To learn how to create your own private Docker registry, check out How To Set Up a Private Docker Registry on Ubuntu 14.04.

To create an account on Docker Hub, register at Docker Hub. Afterwards, to push your image, first log into Docker Hub. You’ll be prompted to authenticate:

  • docker login -u docker-registry-username

If you specified the correct password, authentication should succeed. Then you may push your own image using:

  • docker push docker-registry-username/docker-image-name

It will take sometime to complete, and when completed, the output will similar to the following:

Output:

The push refers to a repository [docker.io/finid/ubuntu-nodejs]
e3fbbfb44187: Pushed
5f70bf18a086: Pushed
a3b5c80a4eba: Pushed
7f18b442972b: Pushed
3ce512daaf78: Pushed
7aae4540b42d: Pushed

...

After pushing an image to a registry, it should be listed on your account’s dashboard,

If a push attempt results in an error of this sort, then you likely did not log in:

Output:

The push refers to a repository [docker.io/finid/ubuntu-nodejs]
e3fbbfb44187: Preparing
5f70bf18a086: Preparing
a3b5c80a4eba: Preparing
7f18b442972b: Preparing
3ce512daaf78: Preparing
7aae4540b42d: Waiting
unauthorized: authentication required

Log in, then repeat the push attempt.

Conclusion

There’s a whole lot more to Docker than has been given in this article, but this should be enough to getting you started working with it on Ubuntu 16.04. Like most open source projects, Docker is built from a fast-developing codebase, so make a habit of visiting the project’s blog page for the latest information.

Please Note: The content of this page is collected from the https://www.digitalocean.com site for my personal reference in future use. Therefore, all the credit and copyrights goes to the mentioned site

Fix Docker’s networking DNS config


Sometimes, Docker‘s internet connectivity won’t be working properly, which can lead to a number of obscure errors with your applications. In my experience, this is usually because DNS lookups are failing in Docker images.

If you know it’s a DNS problem and you’re in a hurry, jump straight to the system-wide solution.

Is DNS the problem?

Fortunately it’s easy to test Docker’s DNS.

First, check that basic internet connectivity is working by pinging a public IP address. It should succeed, giving you output similar to this:

$ docker run busybox ping -c 1 192.203.230.10  # Ping a London-based NASA root nameserver
PING 192.203.230.10 (192.203.230.10): 56 data bytes
64 bytes from 192.203.230.10: seq=0 ttl=53 time=113.866 ms

--- 192.203.230.10 ping statistics ---
1 packets transmitted, 1 packets received, 0% packet loss
round-trip min/avg/max = 113.866/113.866/113.866 ms

But now try resolving the domain google.com:

$ docker run busybox nslookup google.com
Server:    8.8.8.8
Address 1: 8.8.8.8
nslookup: can't resolve 'google.com'

If it fails as shown above then there is a problem resolving DNS.

Why?

By default, if Docker can’t find a DNS server locally defined in your /etc/resolv.conf file, containers will default to using Google’s public DNS server8.8.8.8, to resolve DNS.

In some networks, like Canonical’s London office network where I work, the administrators intentionally block the use of public DNS servers to encourage people to use the network’s own DNS server.

In this case, Docker containers using the default configuration won’t be able to resolve DNS, rendering the internet effectively unuseable from within those containers.

I’ve filed a bug about this issue, although I don’t yet know when or if it might be addressed.

The quick fix: Overriding Docker’s DNS

Fortunately, it’s fairly easy to directly run a docker container with a custom DNS server.

Discover the address of your DNS server

You can find out what network’s DNS server from within Ubuntu as follows:

$ nmcli dev show | grep 'IP4.DNS'
IP4.DNS[1]:                             10.0.0.2

Run Docker with the new DNS server

To run a docker container with this DNS server, provide the --dns flag to the run command. For example, let’s run the command we used to check if DNS is working:

$ docker run --dns 10.0.0.2 busybox nslookup google.com
Server:    10.0.0.2
Address 1: 10.0.0.2
Name:      google.com
Address 1: 2a00:1450:4009:811::200e lhr26s02-in-x200e.1e100.net
Address 2: 216.58.198.174 lhr25s10-in-f14.1e100.net

And that’s what success looks like.

The permanent system-wide fix

The above solution is all very well if you’re only temporarily inside a restrictive network and you only need to run containers directly.

However, most of the time you’ll want this to work by default and keep working on your system, and for any other programs that rely on Docker.

Update the Docker daemon

To achieve this, you need to change the DNS settings of the Docker daemon. You can set the default options for the docker daemon by creating a daemon configuration file at /etc/docker/daemon.json.

You should create this file with the following contents to set two DNS, firstly your network’s DNS server, and secondly the Google DNS server to fall back to in case that server isn’t available:

/etc/docker/daemon.json:

{
    "dns": ["10.0.0.2", "8.8.8.8"]
}

Then restart the docker service:

sudo service docker restart

Testing the fix

Now you should be able to ping google.com successfully from any Docker container without explicitly overriding the DNS server, e.g.:

$ docker run busybox nslookup google.com
Server:    10.0.0.2
Address 1: 10.0.0.2
Name:      google.com
Address 1: 2a00:1450:4009:811::200e lhr26s02-in-x200e.1e100.net
Address 2: 216.58.198.174 lhr25s10-in-f14.1e100.net

Please Note: This post is collected from https://robinwinslow.uk site. I am just posting the solution here as my future reference. All the credit and copyrights goes to the mentioned site.

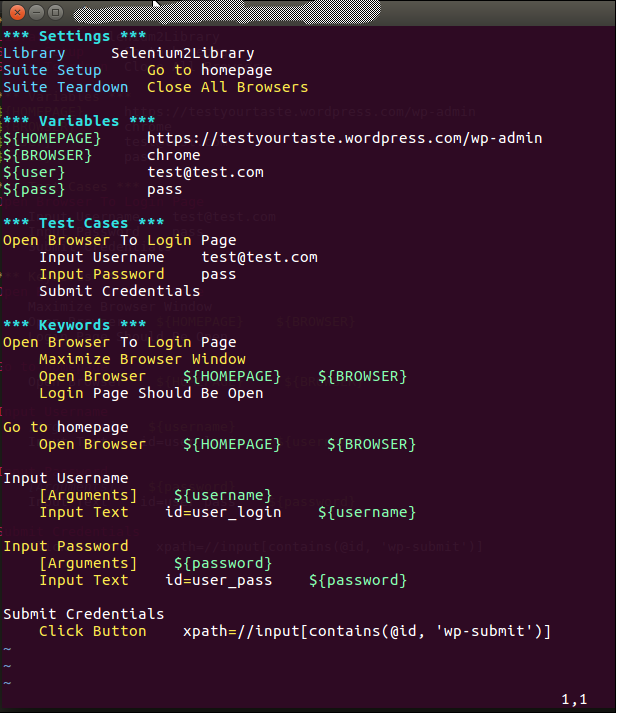
How To Add Robot Framework Syntax in Sublime Text and VIM editor


By default, files for the Robot Framework do not show any syntax on Sublime Text or VIM, with some tweaks we can add Robot Framework syntax.

For Sublime Text 2:

Open Sublime Text 2 and click Preferences -> Browse Packages to open the packages directory. Then create a directory named Robot Framework containing the contents of the following repository:

https://github.com/seeamkhan/sublime-robot-plugin

Note: The contents of the repository should be directly under the Robot Framework directory.

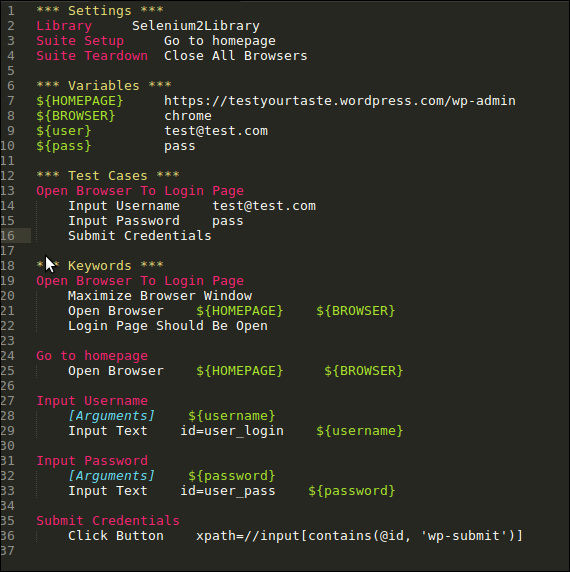
Now close the Sublime Text 2 editor if it’s already been opened and then open a file with Robot Framework syntax, the syntax should be now visible like below:

Selection_012

For VIM Text Editor:

Clone the git repository in any place:

git clone https://github.com/seeamkhan/robotframework-vim

Go to the content directory:

cd robotframework-vim

Make sure the directory ~/.vim/ already exist for the current user, if not then create the directory:

mkdir ~/.vim

Now copy all the contents to ~/.vim/ location:

cp -R * ~/.vim/

Now open any files with Robot Framework syntax in the VIM editor, the syntax should be visible like below:

Selection_014

LAMP and Virtual Host


Every time I set-up a new Linux PC, I need to install LAMP and Virtual Hosts etc etc. Definitely, there are a lot of resources about how to do all those stuff but I have to spend a lot of time for finding those. Because, most of the time the site which I bookmarked last time does not found. Therefore, I am creating this post with collection of commands which will help for set-up LAMP and Virtual Host very quickly.

Setup LAMP:

Step 1: Install Apache

sudo apt-get update
sudo apt-get install apache2

When apache2 installation is done, try hitting http://localhost URL in the browser. It should show Apache2 Ubuntu default page.

Step 2: Install MySQL

sudo apt-get install mysql-server

sudo mysql_secure_installation

Answer y for yes, or anything else to continue without enabling.

You’ll be asked to select a level of password validation. Keep in mind that if you enter 2, for the strongest level, you will receive errors when attempting to set any password which does not contain numbers, upper and lowercase letters, and special characters, or which is based on common dictionary words.

Please enter 0 = LOW, 1 = MEDIUM and 2 = STRONG: 1

For the rest of the questions, you should press Y and hit the Enter key at each prompt.

Step 3: Install PHP

sudo apt-get install php libapache2-mod-php php-mcrypt php-mysql

To do this, type this command to open the dir.conf file in a text editor with root privileges:

sudo nano /etc/apache2/mods-enabled/dir.conf

It will look like this:

/etc/apache2/mods-enabled/dir.conf

DirectoryIndex index.html index.cgi index.pl index.php index.xhtml index.htm

We want to move the PHP index file highlighted above to the first position after the DirectoryIndexspecification, like this:

/etc/apache2/mods-enabled/dir.conf

DirectoryIndex index.php index.html index.cgi index.pl index.xhtml index.htm

sudo systemctl restart apache2

Step 4: Test PHP Processing on your Web Server

sudo nano /var/www/html/info.php

This will open a blank file. We want to put the following text, which is valid PHP code, inside the file:

info.php

<?php phpinfo();
?>

Now visit: http://your_server_IP_address/info.php

sudo rm /var/www/html/info.php

Now the LAMP installation is done!

Now we need to create some virtual hosts. I have found a script which worked great for me, I have forked the script in my GIT, so here is the script: https://github.com/seeamkhan/virtualhost

Download as Zip,  then extract it.

You will find a directory named ‘virtualhost-master’. Open it and add exe permission for the ‘virtualhost.sh’ file:

$ chmod +x /path/to/virtualhost.sh

Now create virtual host by typing this command:

sudo virtualhost.sh create mysite.com

Now browse http://mysite.com

Install phpMyAdmin:

To get started, we can simply install phpMyAdmin from the default Ubuntu repositories.

sudo apt-get update
sudo apt-get install phpmyadmin php-mbstring php-gettext
  • For the server selection, choose apache2.
  • Select yes when asked whether to use dbconfig-common to set up the database
  • You will be prompted for your database administrator’s password
  • You will then be asked to choose and confirm a password for the phpMyAdmin application itself

The installation process actually adds the phpMyAdmin Apache configuration file into the /etc/apache2/conf-enabled/ directory, where it is automatically read.

The only thing we need to do is explicitly enable the PHP mcrypt and mbstring extensions, which we can do by typing:

sudo phpenmod mcrypt

sudo phpenmod mbstring

Afterwards, you’ll need to restart Apache for your changes to be recognized:

sudo systemctl restart apache2

You can now access the web interface by visiting your server’s domain name or public IP address followed by /phpmyadmin:

https://domain_name_or_IP/phpmyadmin

If you get a 404 error upon visiting http://localhost/phpmyadmin:You will need to configure apache2.conf to work with Phpmyadmin.

$ gksudo gedit /etc/apache2/apache2.conf

Include the following line at the bottom of the file, save and quit.

Include /etc/phpmyadmin/apache.conf

Now Restart the apache server and try again to phpmyadmin:

sudo systemctl restart apache2

Decorate Terminal


Everyone loves to decorate their PC. Specially when you are working in a Linux OS there are lots of opportunity to customize and decorate. Here’s a simple one, about how to change user and host name color in terminal:

This is very simple, just open the terminal and type this to edit the .bashrc file:

sudo leafpad ~/.bashrc

Now uncomment the following line:

#force_color_prompt=yes

Then go to the following lines:

PS1='${debian_chroot:+($debian_chroot)}\[\033[01;32m\]\u@\h\[\033[00m\]:\[\033[01;34m\]\w\[\033[00m\]\$ '

Pay attention at the part \u@\h it is saying “user@host” and the number before it \[\033[01;32m\] indicates the color. This is what you have to change. For example, lets change the “user” for red, the “@host” for white, edit the line to looks like:

PS1='${debian_chroot:+($debian_chroot)}\[\033[01;31m\]\u\[\033[01;37m\]@\h\[\033[00m\]:\[\033[01;34m\]\w\[\033[00m\]\$ '

Now save the file.

Close the terminal and open it again.

Bingo!!

Create a free website or blog at WordPress.com.

Up ↑